
Smart Window
Aim of the Project: To make a smart window project using water level module and servo motor with Pinoo control card.
Time: 2 lessons
Age Group: 9 years old and above
Main goals:
- Learns to code the Pinoo control card.
- Learns to use a water level module.
- Learns to use servo motor.
- The ability to establish algorithms improves.
- Coding skill improves.
Required Materials: Mblock 3 program, pinoo control card, water level module, servo motor module.

Materials Required for Design: Cardboard, colored cardboard, adhesive eva, tongue stick, felt, silicone gun and silicone.


Implementation of the Project:
- Let's start with window design for our project first. We will make use of colored cardboards while designing the window. Let's create windows with colored cardboards.
We cut the colored cardboard piece into a rectangular shape.

We paste the colored cardboard piece we cut as in the phototograph.

We also stick the side pieces and the design takes the form of a rectangle.

To support the rectangle, we cut the colored cardboard piece as in the photograph.

We paste it on the back of the rectangle.

It will look like this from the side.

We will make a curtain with felt so that the rectangular design looks like a window.

We stick some of it like in the photograph.

Since we will place the servo motor in the middle part, we support it from cardboard.

We place the servo motor.
NOTE: Check the angles of the servo motor and stick it according to the angle of rotation.
We paste the tongue stick to the tip of the servo motor.

We stick the water level module.
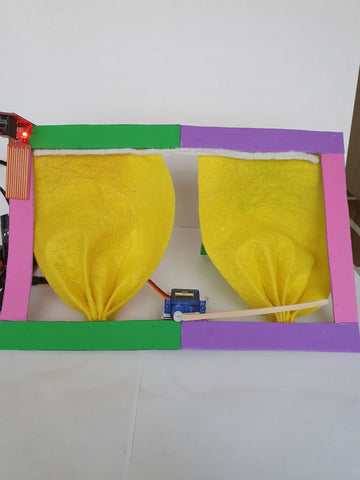
Our design phase is ready.
2. Adding the Pinoo extension:

We click on “Manage Extensions” option from the Extensions tab.

In the window that opens, we write “Pinoo” in the search engine and in the window that appears, it is enough to click on download. It was installed on our computer.
3. Connecting the Pinoo control card to the computer:

In Mblock 3, we click on the "Connect" tab in the upper left.

We click on the "Serial Port" section from the opened window and select the "COM6" option from the opened page.
NOTE: Since the port gates of each computer are different, the numbers next to the COM text may vary.

We click on the Cards tab.

From the window that opens, we select the “Arduino Nano” board option used by the pinoo control card.
 We click on the Extensions tab.

In the window that opens, we select the extension of the control card ‘Pinoo’ we use.

We click on the Connect tab.

We click on “Firmware Update” from the window that opens.
4. Coding part:

To start the servo motor, we run it under the "key pressed" command. Since the servo motor operates between 0 and 180 degrees, we try both angles.

To run the water level module, we insert it into the "Say" command and see the values on the dummy.

If value is 0, the water level module does not detect any liquid.

If it shows a value greater than 200, fluid contact is detected.

We use 2 "if-else" commands, as we will operate according to 2 situations, and our servo motor will operate according to the situation of being bigger / smaller than 200.

If the value detected by the water level module is less than 200, that is, if there is no rain, it will not move, it will remain constant at the “0” angle. If the value detected by the water level module is greater than 200, there is rain, the servo motor will move between “180” degrees and “0” degrees.
IMPORTANT: Be sure to try your angles, there may be different angles in each example. The reason for this is the position of the servo motor.

In order to load our codes on the pinoo control card, we make our event start “Pinoo Program” command.

We right click on the "Pinoo Program" command and select the "Upload to Arduino" option in the window that opens.

On the page that opens, we click the "Upload to Arduino" button, which is selected in red.

Our codes are uploaded to our pinoo control card.

After the "Loading is Over" text, we click the "Close" button. After installation, the battery and battery holder are installed and the project is run.
5. Implementation of the Project:

After the program installation is finished, we connect it with a 9V battery to run the project regardless of the computer.

The servo motor will not start the first time we insert the battery.

If there is no liquid contact, the servo motor will stay at the “0” angle.

While there is fluid contact, the servo motor will go from 0 to 180 and will return from 180 to 0. This is how the project works as long as the fluid contact continues. If there is no liquid contact, it waits at an angle of 0.