
Blueutooth Controlled Parking With Pinoo
Purpose of the Project: To make a parking system controlled by a phone using a Bluetooth module and servo motor with the Pinoo Control Card.
Duration: 2 lessons
Age Group: 9 years old and over
Pinoo Sets: Maket Set and Full Set
Gains:
• Learns to code Pinoo control card.
• Learns to use the Bluetooth module.
• Learns to use servo motor.
• Improves the skill of setting up algorithms.
• Improves coding skill.
Materials to be used: Mblock 3 program, Pinoo control card, servo motor module, connection cables.

Materials Required for the Design: Black cardboard, wooden boards, brown cardboard, scissors, ice cream stick, tongue stick, silicone gun and silicone.

Project Preparation:
1. For our project, we first start by making a parking shed from wooden plates.

We fix the wooden plates with the help of a silicone gun as in the picture.

We fix our hut on our black cardboard as in the picture.

We cut the ends of the ice cream sticks with the help of scissors to be easy to fix on the ground.

Then we fix our ice cream sticks that will serve as walls at intervals.

We cut our brown cardboard to the correct sizes and glue it to the ice cream sticks.

We make car parking spaces with white tape.

We fix our servo motor on the side of our shed.

We fix our tongue stick parallel to the brush of our servo motor and we complete the design part of our project.

In order to use our Bluetooth module, we download the "Arduino Bluetooth Controller" application from the Google play store from our phone that works with the Android operating system. Then, after opening the application, we select our HC-06 bluetooth module. Then we complete the matching by entering the password as '1234' for matching.

Then we see a window, we open and close the process, that is, 2 operations.
We choose the "Switch Mode" option because we will do it. On the next screen, we click on the settings section on the upper right. From here, we write the closing operation that we will do in our codes as 0 opening operation and confirm it.
2.Adding Pinoo extension:

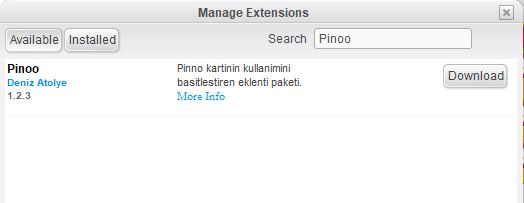
In the window that opens, we type "Pinoo" into the search engine and simply say download to the result.
It was installed on our computer.
3.Connecting the Pinoo sensor board to the computer:


We click on the "Serial Port" section from the window that opens and select the "COM6" option from the page that opens.
NOTE: Since the port entries of each computer are different, the numbers next to COM text can vary.


We click on "Firmware Update" from the window that opens.
4. Coding part:

We run the servo motor under the "key is pressed" command to start it. Since the servo motor works between 0 and 180 degrees, we try both angles.

We add our code block, which introduces the connection points of our bluetooth module, under the "Pinoo Program" code. Since we want our barrier to stop in the closed position at the beginning, we add the code to bring it to 90 degrees. Then, if the bluetooth connection is established, we want it to read the numerical data from bluetooth. If the incoming numerical data is equal to 1, that is, when we press the open button from the Arduino Bluetooth Controller application, bring our servo motor to 180 degrees. If it is equal to 0, that is, if we want to close the barrier, we tell it to bring our servo motor to 90 degrees.
Note: Servo motor angles can vary depending on how you install the brush of the servo motor. For this, it is important to try angles in this project.

We right click on the "Pinoo Program" command and select the "Upload to Arduino" option in the window that opens.

On the page that opens, we click on the "Upload to Arduino" button selected in red.

Our codes are uploaded to our Pinoo sensor card.

We click on the "Close" button after the "Download Finished" text appears. After the installation is finished, the battery compartment is inserted and the project is run.
5. Working Status of the Project:

Now we can control our parking barrier remotely with the help of a bluetooth module.