
Energy Saving Tunnel
ENERGY SAVING TUNNEL WITH PİNOO
Aim of the Project: Building an energy-efficient tunnel using the Pinoo Control Card. Using the LDR (light sensor) at the entrance of the tunnel, the vehicle will be detected when the vehicle enters the tunnel. The led will only be turned on when the vehicles are in the tunnel and the led will turn off when there is no vehicle in the tunnel.
Time: 2 lessons
Age Group: 9 years old and above Main goals:
- Learns to code the Pinoo Control Card.
- Learns to use Ldr (light sensor).
- Learns to use LED.
- The ability to establish algorithms improves.
- Coding skill improves.
- Design skill improves.
Required Materials:
- Mblock 3 program
- Pinoo Control Card
- Ldr (Light Sensor)
- Led
- Cables

Materials Required for Design: Crepe paper, cardboard, silicone gun and silicone.


Implementation of the Project:
- Let's start our project by designing a tunnel first. Let's stick one cardboard as the ground and the other as a tunnel with the help of a silicone machine.

- After creating the tunnel, let's cover it with a color crepe paper of our choice.

- Then, let's cut the top of the tunnel to fit the led from tunnel exactly. After cutting, let's place our led in a tunnel.

- After fixing our LED on the top, let's make a hole in the lower entrance part of the tunnel so that the LDR (light sensor) will fit. After this process, let's fix our LDR sensor.
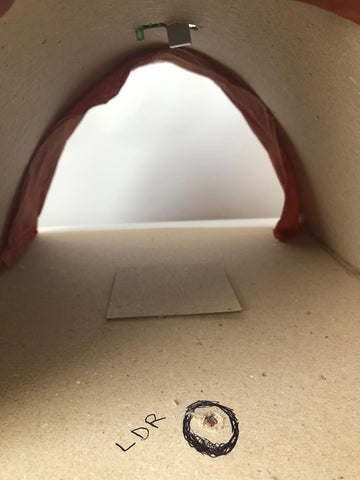
- After installing the led and ldr, let's connect it to the Pinoo Control Card. We connected the LED to the 4 number input and the LDR to the 8 number input. (As long as it matches the colors on the sensors, different inputs on the Pinoo Control Card can also be connected)

- We have completed our design and connections, now let's move on to the coding section. We will use the Mblock 3 application for this.

- Let's connect our Pinoo Control Card to the computer with the connection cable and enter the Mblock3 application. Then, let's introduce our Pinoo Control Card to the computer. To do this, we first click on the serial port option on the Connect tab. Then we select com4. (The number may differ depending on the computer and port.)

- After making the serial port connection, let's choose the card we will use from the cards tab. We work with Arduino's Nano model.

- After selecting our card, we click on the Pinoo option from the Extensions tab. We will write our codes with the Pinoo extension.

- After making our selections, we finally complete the connection process by doing Firmware Update from the Connect option.

- After the update is over, we proceed to the coding stage. First of all, we get the code "Clicking the Green Flag" from the Events menu.

- Then we get the code 'Say Hello' from the View menu. With this code, we will be able to learn the values of the sensors from the panda in the next step.

- We get the code that will read the value of the Light Sensor from the Robots menu and place it inside the 'Say Hello' code.

- We place our codes in the 'Repeat Continuous' code to constantly see the changing values of the light sensor. Then we click on the green flag to look at the value shown by our panda. (Values may differ depending on the environment.) It showed the value 119.

- Then we close the hand or any object on the ldr (light sensor) and note the value that comes out. When it was in the dark or with an object on it, it showed the value 17.

- By taking the 'if-else' code from the control menu, we will operate our led according to the value indicated by the light sensor.

- To make a transaction, we place the 'less than' code inside the condition statement from the transaction menu.

- To the left of the less than expression, we place the code that reads the value of ldr (light sensor). On the right side, we enter the average of the values we measure in the dark and in the normal environment of ldr (light sensor). (It can be a value between 50 and 70.)

- If the Ldr (light sensor) value is less than 50, that is, if the car passes over the sensor, the status of our led should be high, also mean it will be on. If it is greater than 50, that is, if there is no object on our sensor, our led will be low, in other words, it will be off.

- Our LED is high/open, the LED should remain on until the vehicle leaves the tunnel. For this, we can add an average waiting time after the LED lights up.. We set this time as 10 seconds.

- After finishing all our codes, we run our project by clicking on the green flag. If there is no problem in its operation, we must load the codes into our card in order to run our project with a power supply independent from the computer. For this, we first extract our 'Say Hello' code. (Since the code 'Say Hello' is a code that allows our puppet to speak, this code does not work when we want to load our codes on the card.)

- Then we extract the 'click on the green flag' code that we used at the beginning and get the Pinoo Program code from the Robots menu.

- We right click on this code and click on the option "Upload to arduino" (We work with arduino as a card.)

- We are waiting for the codes to be loaded on the card. After the installation is completed, we close the window and remove the Pinoo Control Card connection cable from the computer.

- With the help of 9v battery and battery cap, we power our Pinoo Control Card. In this way, our project will be able to work independently from the computer. As the vehicle passes over, the lights of our tunnel will turn on for 10 seconds, and in the absence of any vehicles, the lights will remain off.
