
Patient Bed System With Pinoo
Purpose of the Project: To make a bed system that can be moved up or down as desired by using a joystick module and servo motor with the Pinoo Control Card.
Duration: 2 lessons
Age Group: 9 years and above
Pinoo Set: Maker Set, Full Set.
Gains:
• Learns to code Pinoo control card.
• Learns to use the joystick module.
• Learns to use servo motor.
• Improves the skill of setting up algorithms.
• Improves coding skill.
Materials to be Used: Mblock 3 program, Pinoo control card, servo motor, joystick module, connection cables.

Materials Required for Design: White eva, white cardboard, scissors, tongue stick, silicone gun and silicone.

Project Preparation:
1. For our project, we start by cutting our white cardboard into a bed.

Then we fix the tongue sticks in the shape of the foot of the bed with the help of a silicone gun.
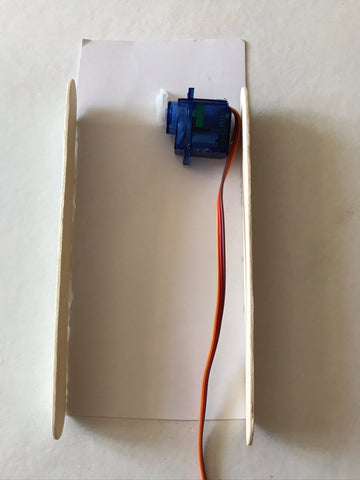
We fix our servo motor to move the head of the bed. The part we need to pay attention to here is to move the head of the bed by ensuring the correct movement of the servo motor brush.

By sticking the white eva on our bed, we give the image of a quilt.

We do the same step for the pillow.

Then we complete our design by connecting our servo motor to the 1st door and our joystick module to the 9th door.
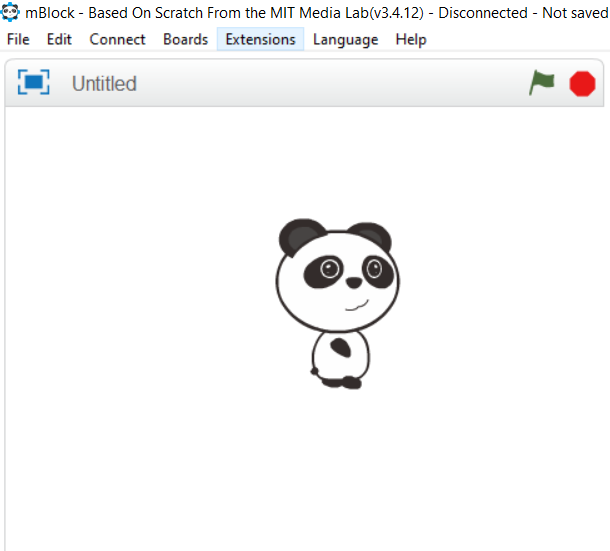
2.Adding Pinoo extension:

From the Extensions tab, we click on the "Manage Extensions" option.

In the window that opens, we type "Pinoo" into the search engine and simply say download to the result.
It was installed on our computer.
3.Connecting the Pinoo sensor board to the computer:

In Mblock 3, we click on the "Connect" tab on the upper left.

We click on the "Serial Port" section from the window that opens and select the "COM6" option from the page that opens.
NOTE: Since the port entries of each computer are different, the numbers next to the COM text may change.

We click on the ‘Cards’ tab.

We select the "Arduino Nano" card option used by the Pinoo sensor card from the window that opens.
We click on the ‘Extensions’ tab.

In the window that opens, we select the extension "Pinoo" of the sensor card we use.

We click on the ‘Connect’ tab.

We click on "Firmware Update" from the window that opens.
4. Coding part:

We run the servo motor under the "key is pressed" command to start it. Since the servo motor works between 0 and 180 degrees, we are trying both angles.
Note: Servo motor angles can vary depending on how you install the brush of the servo motor. For this, it is important to try angles in this project.


Before starting our code, we define a variable named ‘angle’ to hold the angle values and because we will only use the y axis of our joystick module, due to it has only up and down movement.

Under the Pinoo program event code, we add the code to get ‘angle 90’ because we want the angle of our servo motor to be flat at first. Then, in the continuous repeat loop, we transfer the values from the joystick module to our y variable in order to use the y variable while writing our codes.

If the value of our y variable is less than 450, we increase our angle value by 5and assign it to the angle of our servo motor. In this way, our y variable will ensure that our servo motor, that is, our bearing head, will move upwards every time this condition is met.

Our other condition is that if our y variable is less than 550, that is, if my joystick module is moved downwards, the value of our ‘angle’ variable will be reduced by 5 and transferred to the angle of our servo motor. In this way, our servo motor, that is, the headboard, will be moved down.

We right click on the "Pinoo Program" command and select the "Upload to Arduino" option in the window that opens.

On the page that opens, we click the "Upload to Arduino" button selected in red.
Our codes are uploaded to our Pinoo sensor card.

We click on the "Close" button after the "Download Finished" text appears. After the installation is finished, the battery compartment is inserted and the project is run.
5. Working Status of the Project:

When we pull our joystick module up, the headboard moves downward when we pull it up and down.
WITH PINOO SETS, CHILDREN CAN MAKE HUNDREDS OF PROJECTS WITH MATERIALS THEY CAN EASILY FIND IN THEIR HOMES.