
Smart House With Pinoo
Project Purpose: To make a smart home project using a dc motor, servo motor, led module with App Inventor and Pinoo control card.
Duration: 2 lessons
Age Group: 9 years and over
Gains:
• Learns to code Pinoo control card.
• Learning the App Inventor program.
• Learns to use a LED module.
• Learns to use servo motor
• Learns to use dc engine.
• Improves the skill of setting up algorithms.
• Improves coding skill.
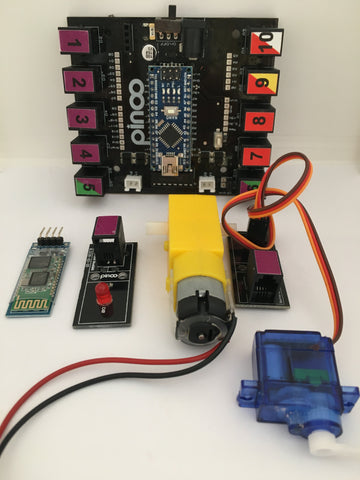
Materials to be used: Mblock 3 program, App Inventor program, Pinoo control card, servo motor, dc motor, led modüle.
NOTE: First of all, you need to download the App Inventor program.
Materials Required for Design: Cardboard and colored cardboard, scissors and a utility knife, chenille, pompom, propeller, silicone gun and silicone.

Project Preparation:
For our project, let's start by designing a house first.

Perpendicularly on both sides of a cardboard with equal edges we fold as.

We measure the sides and silicone them with cardboard.

We draw a door in the front.
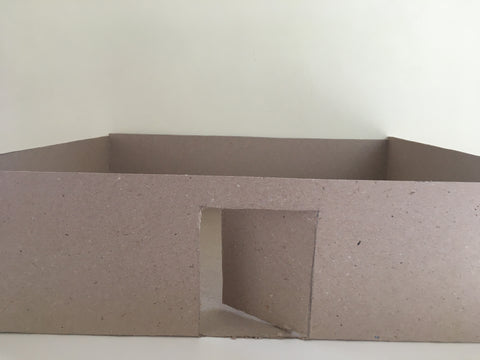
We cut the door shape we drew with a utility knife

We cover the outer part with the desired color cardboard using silicone.

We cover the interior with the desired color cardboard using silicone.

We draw and cut 2 strips and 1 square shape with colored cardboard. We bend the square piece in the middle and bring it to an upright position.

We create a vertical shape by tilting the ends of the strips cardboard. Then we silicon the lower part of the other part. We create a seat.

We silicone 4 pompoms on the seat.
We cut a rectangular piece with colored cardboard. We cut 2 pieces of strip in length and 4 pieces at the longest length of this piece.

We combine the pieces in shape and form a library.

We silicon 9 pompoms to the library.

We create a square shape with chenille.

We place these pieces we create into the home design.

In the part where we put the seat, we cut an area where the end of the dc motor can enter.

We silicon the dc motor.

We silicon the propeller to the end of the dc motor.

We open the corner where the door is.
 We take out the cable of the servo motor from this gap and pass it through. Then we put it back on.
We do not silicon the servo motor.

We silicon the LED module.

We cut a piece of cardboard as above to attach it to the end of the servo motor.
We will install this part after adjusting the angle of the servo motor.
 We attach the connection cables of the dc motor, servo motor and led module to the Pinoo board.
(Servo motor to 4th door, led module to 1st door)

Then we plug in the USB cable and start coding.
- Adding Pinoo extension:

From the Extensions tab, we click on the "Manage Extensions" option.

In the window that opens, we type "Pinoo" into the search engine and simply say ‘’download’’ to the result.
It was installed on our computer.
- Connecting the Pinoo control board to the computer:

In Mblock 3, we click on the "Connect" tab on the upper left.

We click on the "Serial Port" section from the window that opens and select the "COM6" option from the page that opens.
NOTE: Since the port entries of each computer are different, the numbers next to the COM text may change.

We click on the Cards tab.

We select the "Arduino Nano" card option used by the Pinoo control card from the window that opens.

We click on the Extensions tab.

In the window that opens, we select the extension "Pinoo" of the control card we are using.

We click on the Connect tab.
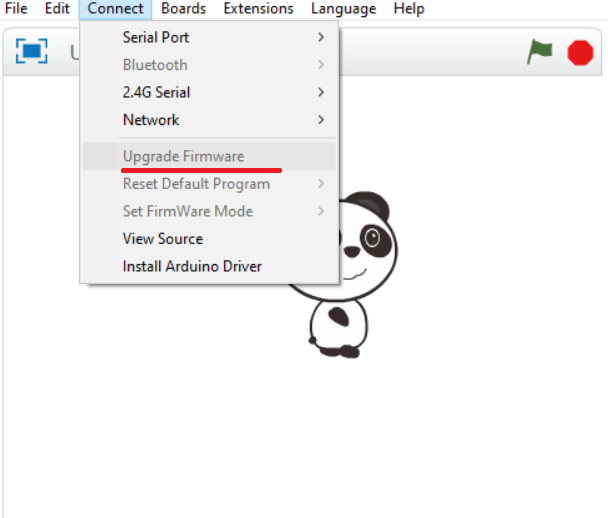
We click on "Firmware Update" from the window that opens.
- Coding part:

First, we make the angle of the servo 90 degrees.

First we close the door and silicon the servo motor as shown in the figure. We squeeze the cut piece to both the end of the servo motor and the door.

It will look like this from the inside.

We delete the codes after adjusting the angle of the servo. We take the Pinoo Program code block and get the required code block to establish the bluetooth connection. We change the RX-TX values.

Repeat continuously, we put the if condition block into the code block. We check if there is a BT connection

We read the digital data coming from bluetooth and add the condition block if it is.
 We are coding our condition that the number data is 0. If it is correct, we make the led status low and turn off the led module.
(We will also use these values in App Inventor.)

If it is, we add the code block to create our other condition. We code our condition, that is, the number data being 1. If it is correct, we make the led status high and make the led module light..

If it is, we add the code block to create our other condition. We are coding our condition that the number data is 2. If it is correct, we make the angle of the servo motor 0 and open the door.

We add the 'if if' block of code to create our other condition. We are coding our condition that the number data is 3. If it is correct, we make the angle of the servo motor 110 and close the door.

We add the 'if if' block of code to create our other condition. We are coding our condition that the number data is 4. If it is correct, we make the dc motor run.

We add the "if" code block to create our other condition. We are coding our condition that the number data is 5. If it is correct, we make the dc motor stop

We right click on the "Pinoo Program" command and select the "Upload to Arduino" option in the window that opens.

On the page that opens, we click on the "Upload to Arduino" button selected in red.
Our codes are uploaded to our Pinoo control card.

We click on the "Close" button after the "Download Finished" text appears.
After this part, we will be coding in App Inventor application. https://appinventor.mit.edu/
We log into App Inventor site with the link above.

We click on the Create Apps button.

We log in with an e-mail address. If you do not have an e-mail address, we need to create it in advance.

The last project made before will appear on the page that opens. A blank phone screen will appear in this area.

On this page, we click the Start New Project option under the My Projects tab.

We do the naming process without using Turkish characters and spaces. We call it "smart_house".

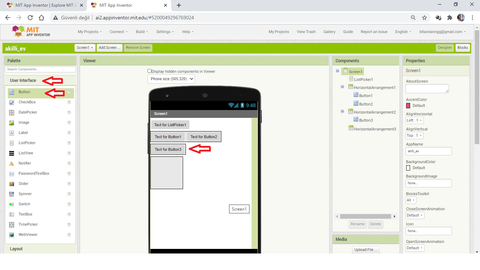
First, we take the ListPicker tool from the User Interface area and drop it on the phone screen with the drag and drop method.

We take the HorizontalArrangement tool from the Layout area and drop the tool on the phone screen by drag and drop.

Again, we take the HorizontalArrangement tool from the Layout area and drop the tool on the phone screen by drag and drop.

Again, we take the HorizontalArrangement tool from the Layout area and drop the tool on the phone screen by drag and drop.

We take the Button tool in the User Interface area into the first HorizontalArrangement tool and drop the tool with drag and drop method. With the same process, we add another button tool next to it.
We take the button tool in the User Interface area into the second HorizontalArrangement tool and drop the tool with drag and drop method.

With the same method, we add one more button tool in the User Interface area into the second HorizontalArrangement tool.

We take the Button tool in the User Interface area into the third HorizontalArrangement tool and drop the tool with drag and drop method.

With the same method, we add one more Button tool in the User Interface area into the third HorizontalArrangement tool.

We select the ListPicker tool and change the Text property in the Properties area to "List".
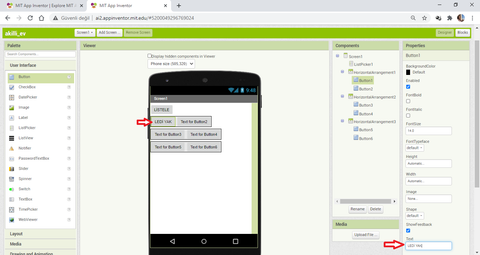
We select the Button1 tool and change the Text property in the Properties area to “LED ON”.

We select the Button2 tool and change the Text property in the Properties area to “OFF LED”.

We select the Button3 tool and change the Text property in the Properties area to "OPEN THE DOOR".

We select the Button4 tool and change the Text property in the Properties area to "CLOSE THE DOOR".

We select the Button5 tool and change the Text property in the Properties area to "ON THE AIR CONDITIONER".

We select the Button6 tool and change the Text property in the Properties area to “OFF THE AIR CONDITIONER”.

We select the Button1 tool and click the Rename button in the Components area.
Changing the text property means changing its image on the phone screen. Renaming with ‘’Rename’’ will help us in the coding part and we will see the tasks of the buttons easier.

We are doing the naming process as "led on" in the area that comes out.

We select the Button2 tool and click the Rename button in the Components area.

We are doing the naming process as "led off" in the resulting area.

We do the same for the other buttons.
Button3-dooropen
Button4-doorclose
Button5-air conditioneropen
Button6-air conditioner
We take and rename it.

We select Screen1 from the Components section and change the AlignHorizontal property to Center.

Again, while Screen1 is selected, we change the AlignVertical property to Center.
By changing these features, we made the tools we added stand in the middle of the screen.
We add the BluetoothClient tool from the Connectivity area by drag and drop method. This tool will not appear on the screen, but we can see all the tools we have added in the Components area.

We click on the Blocks button in the upper right corner of the screen to switch to the coding area.

We place the ListPicker1.BeforePicking code block in the coding area with drag and drop method.

We take the ‘’ListPicker1.Elemets’’ code block and place it inside the BeforePicking code block.Then we add the ‘BluetoothClient1.Connetaddress’ code block.
We are adding the ListPicker1.Selection code block to the continuation.
With these codes, we determine the text of the ListPicker as the Bluetooth device that can be selected.

We place the ListPicker1.AfterPicking code block in the coding area with the drag and drop method. We place the ListPicker.Text code block inside.

Then we add the ‘BluetoothClient1.Connetaddress’ code block.

We are adding the ListPicker1.Selection code block to the continuation.
With these codes, we determine the text of the ListPicker as the Bluetooth device that can be selected.
Thus, we see the bluetooth devices that can be selected.

We add the Lediyak.click code block to the coding area with the drag and drop method.

We click on the BluetoothClient tool and place the BluetoothSendText text code block in it.
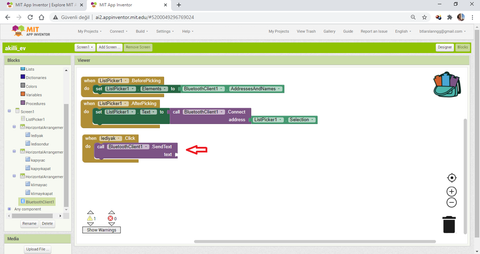
When the Lediyak button is clicked, we will send a message via the Bluetooth tool. Here will be the numerical values that we have determined in the mBlock program.

The digital data we used in mBlock2 to burn the led was 1. We take the 0 code block from the Math field and change it to 1.
So when the lediyak button is clicked, 1 message will be sent.

We click the right mouse button on the Lediyak.Click code block. We choose the Duplicate option from the window that opens. So we are copying.

We change the value of 1 to 0 as the lediyak code is led.
So when this button is clicked, the value 0 will be sent as a message with the bluetoothClient tool.
Whatever the value of 0 is in the Mblock program, it will work. So the led will be extinguished.

We click the right mouse button on the Lediyak.Click code block. We choose the ‘Duplicate’ option from the window that opens. Again, we are copying.
 We change the value of ‘lediyak’ to open the door from 0 to 2.
So when this button is clicked, the value 2 will be sent as a message with the bluetoothClient tool. In the Mblock program, whatever the value of 2 is, it will work. So the servo motor will run and the door will open.

We click the right mouse button above the ‘ac.Click’ code block. We choose the ‘Duplicate’ option from the window that opens. Again, we are copying.

We change the door-open code to close the door and the value of 2 to 3.
So when this button is clicked, the value 3 will be sent as a message with the bluetoothClient tool. In the Mblock program, whatever the value of 3 is, it will work. So the servo motor will run and the door will close.

We click the right mouse button above the ac.Click code block. We choose the Duplicate option from the window that opens. Again, we are copying.
 We change the ‘door-open’ code as air conditioner, and the value of 3 to 4.
So when this button is clicked, the value 3 will be sent as a message with the bluetoothClient tool.
In the Mblock program, whatever the value of 4 is, it will work. So the dc motor will run.
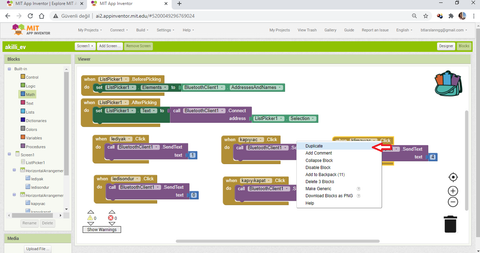
We click the right mouse button above the ac.Click code block. We choose the Duplicate option from the window that opens. Again, we are copying.
 We change the ‘air conditioning’ code to turn off the air conditioner, and the value 4 to 5.
So when this button is clicked, the value 5 will be sent as a message with the bluetoothClient tool.
In the Mblock program, whatever the value of 4 is, it will work. So the dc motor will stop.

Screenshot of all codes.
- Working Status of the Project:

We install the Bluetooth module by paying attention to its pins.

We are installing the 9V battery.
We need to pair the Bluetooth device of our computer with the bluetooth device attached to the Pinoo control card.


That's why we first go to the bluetooth settings of our phone and select the device named HC-06.

We enter the code 1234 to pair. We are now paired with the HC-06.

To run the project we created in App Inventor, we click on the All Companion option under the Connect tab. Here, a code will appear on the screen.

We open the MIT App Inventor 2 application we downloaded to our phone, click on the "scan QR code" option and read the code.
* Make sure that your phone and your computer are connected to the same internet network in order not to get an error here.

We click the ‘List’ button in the application opened on the phone. Bluetooth devices will appear as on the screen. We select the HC-06 device.

The connection will be completed and the field that says List will be true. If you encounter false value, you can click on it and select the device again.

Now you can try by pressing the buttons you want with the phone.
Note: After pressing the buttons, you may need to wait a few seconds for the process to occur.