
Wheel Of Fortune With Pinoo
Purpose of the Project: To make a wheel of fortune system that rotates randomly when the button is pressed by using the button module and DC motor with the Pinoo control card and the task written is desired to be completed.
Duration: 2 lessons
Age Group: 7 years and over
Gains:
• Learns to code Pinoo control card.
• Learns to use button module.
• Learns to use DC motor.
• Improves the skill of setting up algorithms.
• Improves coding skill.
Materials to be used: Mblock 3 program, pinoo control card, button module, DC motor, connection cables.

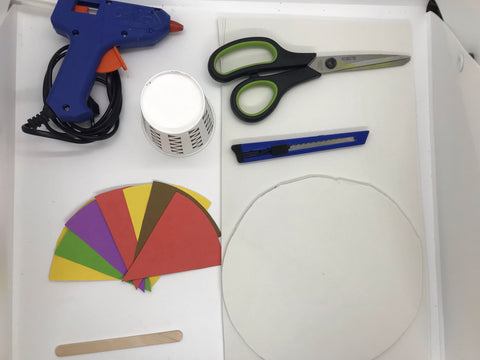
Materials Required for Design: Yellow green, purple, brown and orange cardboard, utility knife, scissors, wooden skewer stick, Dakota cartoon for ground and wheel of fortune, cardboard cup, ice cream stick (2 pieces), silicone gun and silicone.
Project Preparation:
1. For our project, we first take our dakota in hand.

With the help of a utility knife, we drill a round hole in the middle of our dakota for our DC motor.

We cut our two ice cream sticks with scissors as in the picture.

We make a piece of ice cream sticks that we cut into our DC motor to ensure its balance.
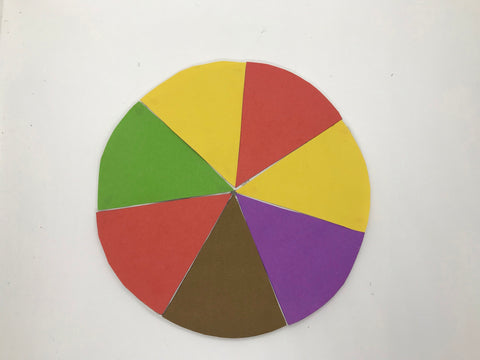
Then we fix the colored cardboards we have prepared with the help of a silicone gun.
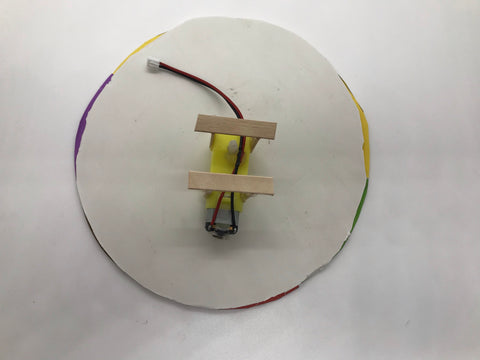
We place our DC motor in the hole we drilled in the dakota.

We will use the arrow we made with our wooden skewer stick and cardboard of any color instead of the indicator.

We write the rules we want on our colored cardboards.

Then we fix our round wheel on the dakota.
 We fix our cardboard glass on the dakota.

We fix the indicator we prepared to the glass as in the picture.

We fix our button module on our cardboard cup and finish our design part.
2.Adding Pinoo extension:

From the Extensions tab, we click on the "Manage Extensions" option.

In the window that opens, we type "Pinoo" into the search engine and simply say download to the result.
It was installed on our computer.
3.Connecting the Pinoo sensor board to the computer:

In Mblock 3, we click on the "Connect" tab on the upper left.
We click on the "Serial Port" section from the window that opens and select the "COM6" option from the page that opens.
NOTE: Since the port entries of each computer are different, the numbers next to the COM text may change.

We click on the Cards tab.
 We select the "Arduino Nano" card option used by the Pinoo sensor card from the window that opens.
 We click on the Extensions tab.

In the window that opens, we select the extension "Pinoo" of the sensor card we use.

We click on the Connect tab.
 We click on "Firmware Update" from the window that opens.
4. Coding part:

First, to check whether our button module works or not, we check the operation status of our panda puppet with our "Say Hello" code and our button arrow code under the "Click" code.

To start the DC motor, we run it under the "button is pressed" command. We controlled the DC motor by running it forward at a speed of 150.

When the green flag is clicked, if our button value is equal to 1, that is, if the button is pressed, we add the codes that enable our Dc engine to rotate at 255 rpm for 5 seconds. If our button value is 0, we add the code that our Dc motor will not move by making its speed zero.

In order to upload our codes to the Pinoo sensor card, we make the "Pinoo Program" command at the beginning of the event. We right click on the "Pinoo Program" command and select the "Upload to Arduino" option in the window that opens.

On the page that opens, we click on the "Upload to Arduino" button selected in red.
Our codes are uploaded to our Pinoo sensor card.

We click on the "Close" button after the "Download Finished" text appears. After the installation is finished, the battery compartment is inserted and the project is run.
5. Working Status of the Project:

Each time we press the button, our wheel will spin for 5 seconds, and it will show us a task to complete.