
Hand Shaking Robot With Pinoo
Project Purpose: To make a robot project with Pinoo Control Card using servo motor, LED and button modules
Duration: 2 lessons
Age Group: 7 years and older
Benefits:
• Learns to code Pinoo control card.
• Learns to use a LED module.
• Learns to use button module.
• Learns to use servo motor.
• Improves the skill of setting up algorithms.
• Improves coding skill.
Required Materials: Mblock 3 program, Pinoo control card, button module, 2 LED modules, servo motor

Materials Required for Design: 2 medium boxes, scissors and a utility knife, colored cardboard, 9 cardboard cups, silicone gun and silicone.

Project Preparation:
1. For our project, let's start by designing a robot.

First we cut the back of the box. We cut the colored cardboards and cover the box with silicone.
Then we cut the colored cardboards and cover the second box by silicon.

We put 3 cardboard glasses inside each other and put them into silicone. Then we cover the outside with colored cardboard by silicon. We do the same process once more. We make the feet of robot design.

We silicone the feet we make from the boxes we cover, under the box that we do not cut.

We put 3 cardboard glasses inside each other and we silicone them. Then we silicon the outside so that there is no open area left. We make the neck of the robot.

We silicone the neck part on the top of the box.

We cut 2 small circles from colored cardboard.

We silicone the circles on the front of the box, the back of which we cut.

We drill holes with a utility knife so that the LED modules can enter.

We place 2 LED modules in the holes we drilled.
Thus, we have completed the face of the robot.
 We silicone the face of the robot to the neck.

1. We cut the rectangular pieces from the back of the box and silicon it with colored cardboard. We fold it evenly on 2 sides.

We bend well at the folded points. Thus, we get the arms of the robot.

We silicone one arm on the left side of the robot's eye.

Instead of the other arm, we first silicon the servo motor horizontally. We will silicon the tip later.

We silicon the button module on the body of the robot.
We install the connecting cables of the led modules. We silicone it to keep it smooth.

We install the connection cables of the servo motor and button module.

We attach the servo motor to the 1st door, the button module to the 2nd door and the led modules to the 3rd and 4th door.

We connect the USB connection cable to the Pinoo control card and to the computer. Now we can start coding.
2.Adding Pinoo extension:

From the Extensions tab, we click on the "Manage Extensions" option.

In the window that opens, we type "Pinoo" into the search engine and simply say download to the result.
It was installed on our computer.
3.Connecting the Pinoo control board to the computer:

In Mblock 3, we click on the "Connect" tab on the upper left.

We click on the "Serial Port" section from the window that opens and select the "COM6" option from the page that opens.
NOTE: Since the port entries of each computer are different, the numbers next to the COM text may change.

We click on the Cards tab.

We select the "Arduino Nano" card option used by the Pinoo control card from the window that opens.

We click on the Extensions tab.

In the window that opens, we select the extension "Pinoo" of the control card we are using.

We click on the Connect tab.

We click on "Firmware Update" from the window that opens.
4. Coding part:

First, when the green flag is clicked, we make the angle of the servo motor 90 degrees.

We lay the tip of the servo motor horizontally.

In this arm parallel to the other arm, we silicon the end of the servo motor.

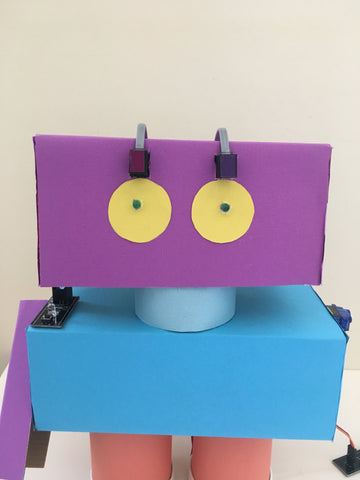
When all the pieces are placed, they will look like the figure.

We delete the other codes and place the code block under the Pinoo Program code block over and over again.

If not, we add the condition structure and create our condition. Our condition is that the value of the button module mounted on the second door is equal to 1. If it is equal to 1, it is printed.
 If our condition is correct, we make the status of the LED modules attached to the 3rd and 4th door low.

After turning off the LEDs, we add the code block repeat 3 times. We change the angles of the servo motor in intervals. So he will be waving.

If the condition is not correct, we make the status of the led modules high and adjust the angle of the servo motor.

We right click on the "Pinoo Program" command and select the "Upload to Arduino" option in the window that opens.

On the page that opens, we click on the "Upload to Arduino" button selected in red.
Our codes are uploaded to our Pinoo control card.
We click on the "Close" button after the "Download Finished" text appears.

5. Working Status of the Project:
 We are installing the 9V battery.


When not pressed, the leds will light, when the button is pressed, the leds will turn off and the servo motor will run and wave.