
Pinball With Pinoo
Purpose of the Project: To make a pinball game by using Pinoo control card, servo motor, motion (PIR) sensor and LCD display module.
Duration: 2 lessons
Age Group: 7 years and over
Pinoo Set: Maker Set and Full Set.
Gains:
• Learns to code Pinoo control card.
• Learns to use servo motor.
• Learns to use an LCD screen.
• Learns to use motion (PIR) sensor.
• Improves the skill of setting up algorithms.
• Improves coding skill.
Materials to be used: Mblock 3 program, Pinoo control card, servo motor, motion (pır) sensor, lcd display module, connection cables.

Materials Required for Design: Dekota, utility knife, silicone gun and silicone.

Project Preparation:
For our project, we first take our wooden sticks.

We fix our decota pieces with the help of a silicone gun as in the picture. Then we drill a hole with the help of a utility knife so that our ball passes and the servo motor passes.

Then we cut the ball with the help of a utility knife for the place where we will throw the ball.

We make a cut with a utility knife for the lcd screen on the front of our game box.

We fix the front panel we prepared to our box with the help of a silicone gun.

We fix our lcd screen as in the photo.
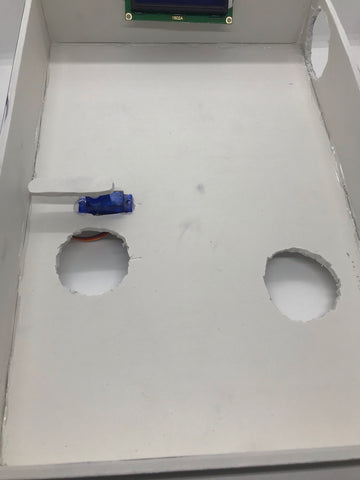
We stick it to the decota part we prepared on the brush of our servo motor and stick our servo to the place we open for the servo.

We calculate the decota pieces for the place where our ball will fall.

We fix our parts with the help of a silicone gun as in the photo.

We fix our PIR sensor.

Then, we bring the holes under our pinball game box to the place where we will get 100 points and where the PIR sensor is.

We connect our Pinoo control card to the number 1 door, our PIR sensor to the number 2 and our lcd display module to the number 10 doors. In this way, we finish the design phase.
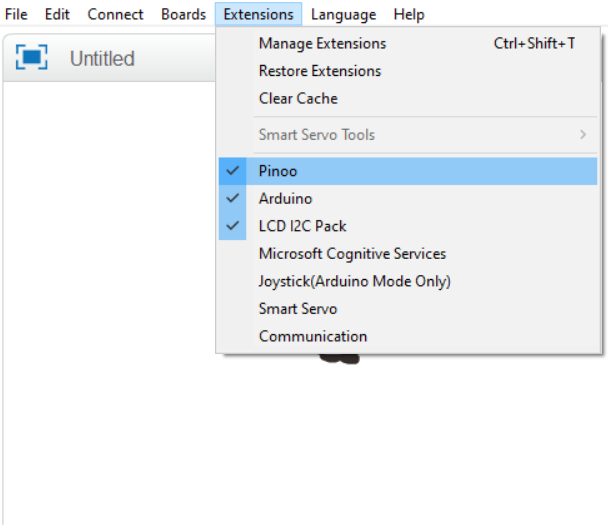
Adding Pinoo extension:

From the Extensions tab, we click on the "Manage Extensions" option.

In the window that opens, we type "Pinoo" into the search engine and simply say download to the result.
It was installed on our computer.
Connecting the Pinoo sensor board to the computer:

In Mblock 3, we click on the "Connect" tab on the upper left.

We click on the "Serial Port" section from the window that opens and select the "COM6" option from the page that opens.
NOTE: Since the port entries of each computer are different, the numbers next to the COM text may change.


We click on the Extensions tab.


We click on "Firmware Update" from the window that opens.
Coding part:

First, we place our lcd screen identification code under the "Pinoo Program" code to check if our lcd display module is working. Then, we place the 'Pinoo LCD Print' code and upload it to arduino. After the installation, we see the text "Hello World!" On our LCD screen. In this way, we check the working status of our LCD screen.

When the green flag of our motion detection sensor is clicked, we check it by placing the code of the sensor arrow into the code under the code.

In order to check whether our servo motor is working or not, we check the working status by adding the servo motor run angle 0 and 180 degree codes under the codes when the key is pressed.

We create a variable from the Data & Block section to keep our scores and call our variable 'Score' in its name.
We are introducing our lcd display module under the Pinoo program event. Then we transfer the value 0 to our score variable. Continuously, we made it move the servo motor angle between 0 and 180 degrees at 3 second intervals.

Then we get a second Pinoo program code to avoid any confusion in our codes. At first, we print the PINBALL text on our LCD screen. If the value read by our motion detection sensor is 1, that is, if there is movement, our score will increase by 1 and we add the code that cleans our LCD screen. Likewise, we print our article on the 1st line. On the 2nd line, we print the code that transmits the values of our score variable next to our "Score" text with the help of the combine code..

We right click on the "Pinoo Program" command and select the "Upload to Arduino" option in the window that opens.

On the page that opens, we click the "Upload to Arduino" button selected in red.
Our codes are uploaded to our Pinoo control card.

We click on the "Close" button after the "Download Finished" text appears. After the installation is finished, the battery compartment is inserted and the project is run.
Working Status of the Project:

We throw our ball from the side section and try to pass it through the hole that says 100. The time we spend, our score value on our LCD screen will increase by 100 points each time we spend.
ARDUINO IDE CODE:
#include <LiquidCrystal_I2C.h>//Lcd ekran kütüphanesini ekledik.
#include <Servo.h>  // Servo kutuphanesi projeye dahil ettik.
LiquidCrystal_I2C lcd(0x27,16,2); //Lcd ekranımızın hangi türde olduğunu ve kaç satır ve sütundan oluştuğunu belirttik.
Servo servomotor;  // Servo motor nesnesi oluşturduk.
int pirPin = 3; //Hareket(pır) sensörünü takacağımız pini belirledik.
int skor=0;//Puan değerlerimizi tutması için int türünde skor adında değeri 0 olan bir değişken tanımladık.
int hareket;//Hareket sensörümüzden aldığımız değerleri tutmak için hareket adında int türünde bir değişken tanımladık.

void setup()
{
  lcd.init();// Lcd ekran modülümüzü başlattık.
  lcd.backlight();//Lcd ekranımızı aydınlatan ledleri yaktık.
  servomotor.attach(2);//Servo motorumuzun hangi pine taktığımızı belirttik.
  pinMode(pirPin, INPUT);///Hareket(pır) sensörümüzün pinimizi giriş birimi olarak ayarladık
}


void loop()
{
  servomotor.write(0);//Servo motor açısını 0 dereceye getirdik.
  delay(3000);//3 saniye beklettik.
  servomotor.write(180);//Servo motor açısını 180 dereceye getirdik.
  delay(3000);//3 saniye beklettik.
   if(hareket==HIGH)//Eğer hareket var ise koşul bloğunu oluşturduk.
   {
     skor=skor+100;//Skor değişkenimizi 100 arttırdık.
     lcd.clear();//Lcd ekranımızda yazı var ise temizledik.
     lcd.setCursor(3,0);//Yazımızı lcd ekranımızda 1. satır 4. sütuna yazacağımızı belirttik.
     lcd.print("PINBALL");//Belirtilen konumda lcd ekranımızda yazımızı yazdırdık.
     lcd.setCursor(0,1);//Yazımızı lcd ekranımızda 2. satır 1. sütuna yazacağımızı belirttik.
     lcd.print("Skor : " + skor);//Belirtilen konumda lcd ekranımızda skorumuzu yazdırdık.

   }
}