
Sports Application With Pinoo
Purpose of the Project: Using the Pinoo control card, to create a system that encourages sports with a tilt and impact sensor and an LCD screen.
Duration: 2 lessons
Age Group: 9 years and older
Set Used: Full Set
Benefits:
• Learns to code Pinoo control card
• Learns to code inclination and impact sensor.
• Learns to code the LCD display module.
• Improves the skill of setting up algorithms.
• Improves coding skill.
Materials to be Used: Mblock 3 program, Pinoo control card, tilt and impact sensor, lcd display module, connection cable

Materials Required for Design: Forex, scissors, silicone gun, paint

Project Preparation:

We will create a box that is large enough to contain the Pinoo control card from forex. For this, we cut rectangular parts (upper and lower part 14 x 11 cm, front and back part 14 x 7.2 cm, right and left part 11 x 7.2. cm)
*** If you wish, you can also create your own dimensions.

We fasten the right and left part to the lower part (floor).


We open a LCD screen-sized window to the part we have determined beforehand and fix the LCD screen to that area with a silicon gun.

We fix the front part to our box design.


We open a window in the middle of the upper part with reference to the size of the tilt and impact sensor. We fix the sensor inside the window.

We fix the upper part to our box design.


Let's make our connections. We place our Pinoo control board in the box and fix the inclination and impact sensor to the purple input number 1, and our LCD screen to the red / white input number 10.

We decorate the design as we wish.
We have completed our connections, now let's move on to the coding part. We will use the mblock-3 application for this.

Let's connect our Pinoo control card to the computer with the help of a connection cable and enter the Mblock3 application. Then let's introduce our Pinoo control card to the computer. To do this, we first click on the serial port option from the Connect tab. Then we select COM3. (The number may differ according to the computer and the port.)

After making the serial port connection, let's select the card we will use from the cards tab. We are working with Arduino Nano model.


. In order to add the Pinoo extension to our computer, we click on the Manage Extensions option from the Extensions tab. In the window that opens, we type "Pinoo" in the search engine and just click download to the result. It has been installed on our computer.

We come to the Extensions tab again and click the Pinoo option. We will write our codes with the Pinoo extension.

In the coding part; Since the lcd screen can only run the code blocks, which are unique to the arduino card, we start our codes with the Pinoo program block in the Robots tab.

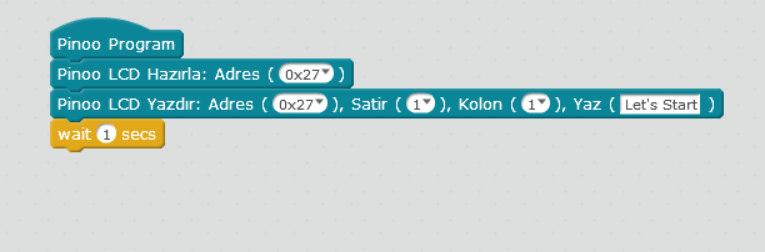
We are introducing the type of our LCD screen. The type of LCD screen we use is 0x27 model.

As soon as our system is turned on, we want to see a welcome text on the LCD screen. For this, we get the command ‘’Pinoo LCD print: Address 0x27 Line: 1 column: 1 write’’ from the Robots tab. We are updating the column section as 2 and Write part as ‘Let's Start!’
*** Be careful not to use Turkish characters in the texts you will print on the LCD screen.

In order for the welcome text to remain on the screen for 1 second, we get the ‘’wait 1 second’’ command from the Control tab.

We will make use of variables to count every move we make. In this step, we create a variable named counter by clicking the ‘Create a Variable’ button in the ‘Data & Block’ tab.
*** We can see our variable in the upper right corner of the stage.
From the Data & Block tab, we get the code block, letting the counter be 0. Thus, our movement status will be reset automatically when our system is running.

Since all the code blocks we will write after completing the initial steps have to work continuously, we get the code block from the Control tab continuously.

After seeing the welcome text for 1 second, we will switch to the actual application text. We will print a title text on the first line of the LCD screen. From the Robots tab, we get the command ‘’print Pinoo LCD: Address 0x27 Line: 1 column: 1 write’’. We update the column section as 2, and the ‘write’ section as the Movement Count.
We will start using our system by fixing it to a height that can be reached by jumping on the wall. We will increase the counter by touching the inclination and impact sensor that we have placed on the upper part of our design, that is, by creating a pulse on the sensor. When we jump five times (when the sensor hits five times) we will get feedback from the system that we have completed our sport. Let's transcode these requests into code.

The inclination and impact sensor gives a value of 1 when it is impacted and 0 when it is stationary. If not, we get the statement from the Control tab.
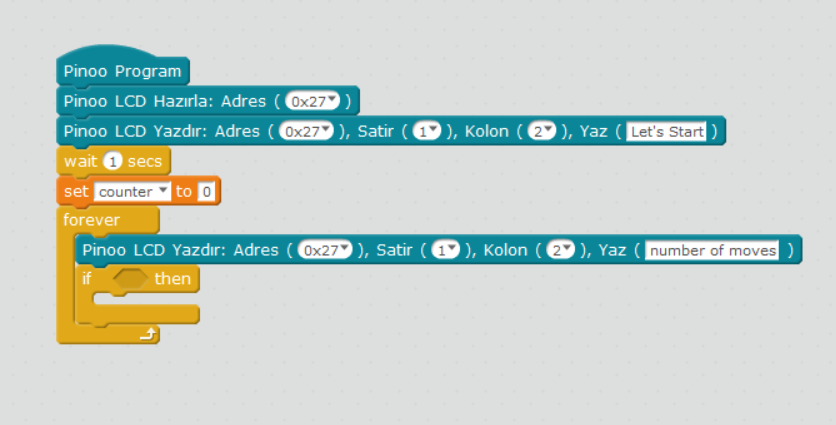
To create the condition section, we get the equals statement from the Operations tab. In the first box, we place the code block related to the inclination and impact sensor from the Robots tab. We change the pin number to pinoo1. In the second box, we write the number 1, which indicates that the sensor has been hit.

If the condition is fulfilled, the counter must increase by one once in 1 second. For this, we get the increase counter command from the Data & Block tab. Then we get the ‘’wait 1 second’’ code block from the Control tab.

In order to display the counter (number of movements) on the second line of the LCD screen, that is, under the title, we get the command ‘’Pinoo LCD print: Address 0x27 Line: 1 column: 1 write’’ from the Robots tab. We update the row section as: 2 column section and 6 write section as counter.
We take the counter text as a block from the Data & Block section.

When the targeted number of moves is completed, that is, when the counter becomes five; To understand whether the counter (number of moves) is equal to five, we will use the ‘’If – otherwise’’ condition statement. From the Control tab we get the ‘’if not’’ statement.

To create the condition section, we get the equals statement from the Operations tab. In the first box, we take the counter text from the Data & Block section and place it as a block. We write 5 in the second box.

We want to see a congratulatory message on the LCD screen for three seconds that our movement count has been completed.We get the command to print ... You've done it! ... on the LCD screen, Pinoo LCD print: Address 0x27 Line: 1 column: 1. We update the line section as: 1 column section as 2 and write section as ... PRESSED! ...
In order to see the congratulation expression on the LCD screen for three seconds, we get the 1 second wait code block from the Control tab. We update the number 1 to 3.
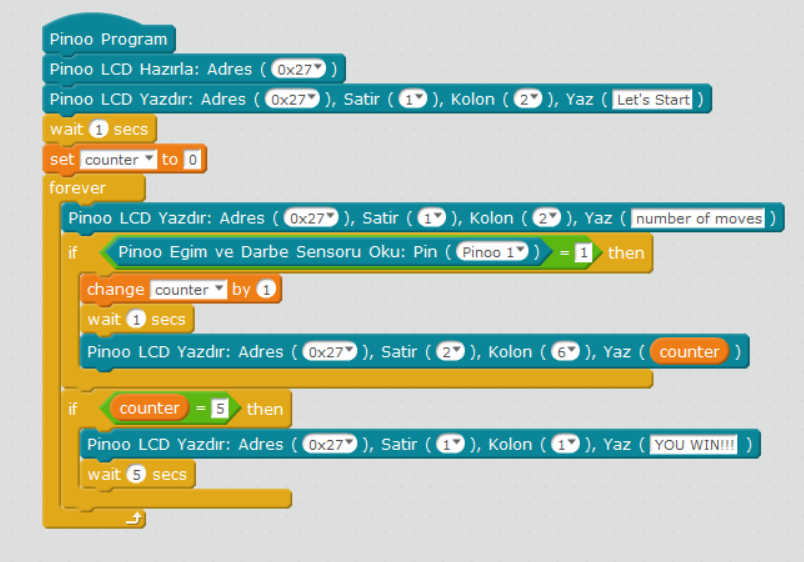
In order to reset the counter (number of moves) at this stage, we receive the command that the counter should be 0 in the Data & Block tab.

We had to load our codes into arduino to see if there was any problem in the operation of our project. For this, we right click the P
inoo program on the code block and click the Upload to Arduino option. . (We work with arduino as a board.)

We are waiting for the codes to be uploaded to the card. After the installation is complete, we close the window.
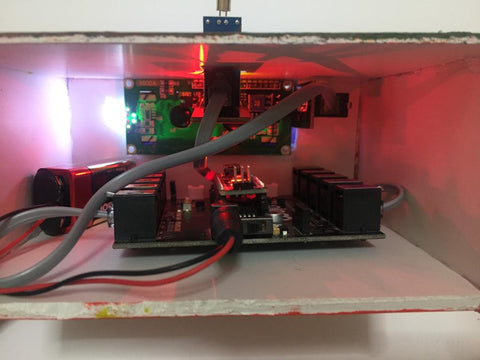
If there is no problem, we disconnect our power cable from the computer. We power our Pinoo control board with the help of a 9v battery and a battery cap. We also turn on the on / off button next to the battery input.


We fix the system on the wall and jump and touch the sensor. You can follow the number of our movements on the LCD screen.