
Human Body With Pinoo Minoo
Purpose of the Project: To create an application to recognize the human body using the Pinoo Minoo card.
Duration: 2 lessons
Age Group: 7 years old and above
Benefits:
• Learns the use of Pinoo Minoo card.
• Improves the skill of creating game designs.
• Improves the skill of setting up algorithms.
• Improves coding skill.
Materials to be Used: Scratch program, Pinoo Minoo Card, Five crocodile (alligator) cables

Materials Required for Design: Forex, felt-tip pen, scissors, silicone gun, aluminum foil

Project Preparation:
1. We cut a 25 x 17 cm rectangular piece on the forex and draw a picture of a person with prominent organs on it. You can also use computer printout if you wish.

2. We draw a circle for each organ one click away from our human model for descriptions of the organs of the brain, lungs, intestines and heart.

3. We cut the inside of the circles and cover the cavity with aluminum foil. We frame it again with the color that represents the organ the circles represent around it.

4. We cut four rectangular pieces, two of which are 17x 4 cm in size and two of 24x4 cm in size, from the forex.

5. We fix the rectangular pieces to the main floor.

6. We take the Pinoo Minoo board and attach a cable to the ground part and a crocodile cable to each w, a, s and d. Finally, we attach a crocoile cable to the earth part.
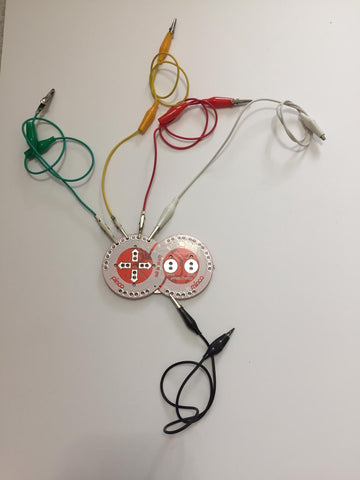
7. We turn the back of the floor and attach the free end of the crocodile cable to one end of each aluminum foil.
• Aluminum foil in the brain to the w key cable,
• A key cable, aluminum foil in the lungs,
• Aluminum foil in the intestine to the key cable s,
• We will attach the aluminum foil in the heart to the d key cord.

8. We will use scratch application for the coding part.

9. In the coding part, we will first design the game. For this, we delete the cat by clicking the right mouse button on the cat puppet. We add our human puppet by clicking the select puppet from your computer button, and then click the select puppet from library button and select the button3 puppet.

10. We click on the draw new puppet button. We will create a title for our application by clicking on the T button on the right side of the drawing screen. We click on the T button and write "WE KNOW OUR BODY".

11. We place our human puppet in the middle of the stage with the title in the lower part.

12. We select our button puppet and click on the disguises section. Right click on the button 3-a and click on the ‘duplicate’ option. We do this process three times. (We will have four disguises in total.)

13. We will change the color of each sword and add explanations. We select the button 3-a and select the yellow color from the color palette at the bottom by clicking on the paint bucket on the right. We paint the button yellow by clicking on the puppet.

14. Click the T button on the right to write a description on it. Our explanation for the yellow color: Brain: It manages our body.

*** If the size of your button is insufficient for explanation, you can enlarge the size by selecting the button and pulling it to the right. We worked with a button size of 188 * 55 here.
15. In turn, we change the color of other disguises and add their explanations.
• Button3-b, color pink, explanation: Lungs: Allows the inhaled air to mix with the blood.
• button3-b2 disguise, color green, explanation: Intestines: It allows the food to be mixed into the blood by breaking down.
• button3-b3 disguise, color red, description: Heart: It pumps blood to the body continuously.

16. We go to the Arrays section. To start the application, we get the code block when the green flag is clicked from the Events menu.

17. In the beginning, we get the hide command from the View menu so that the puppet is hidden.

18. We want to see the explanations of our organs when certain keys of the keyboard are pressed. For this, we get the event of pressing the spacebar from the Events menu and select w from the drop-down menu with the help of the tiny arrow.

19. To make the puppet visible when the button is pressed, we get the ‘’view’’ command from the View menu.

20. In order to make the button3-a disguise of the puppet appear at a certain point, we get the command go to x: 124 y: 13 from the Movement tab. Here the corresponding numbers for x and y may change for you. We update the values to x: 124, y: 100.

21. In order for the desired disguise to appear, we take the code block as button3-b3 from the View menu and select the button3-a option by clicking the tiny arrow.

22. We will assign each character to a different keyboard key. Let's do all the steps we do for the character button3-a in the shape of button3-b. From the Events menu, we get the event of pressing the space key and select the phrase a from the drop-down menu with the help of the tiny arrow.

23. To make the puppet visible when the button is pressed, we get the ‘’view’’ command from the View menu.

24. In order for the puppet's button3-a to appear at a certain point, we get the command go to x: 124 y: 13 from the Movement tab. Here the corresponding numbers for x and y may change for you. We are updating the values to x: 118, y: 32.

25. In order for the desired disguise to appear, we take the code block as button3-b3 from the View menu and select the button3-b option by clicking the tiny arrow.

26. We place the remaining two disguises on the appropriate keyboard key and coordinate.
• For button3-b1: it will be visible when the s key is pressed, its coordinates are x: 113 y: -41;
• For button3-b2: it will be visible when the d key is pressed, its coordinates are x: -193 y: 32;

27. We click on the green flag and then press the appropriate keys (w, a, s, d) on the keyboard to check if there are any problems with the explanations.
28. We connect our Pinoo Minoo board to the computer with a connection cable. We hold the ground wire in our palms. We can start using our application by touching the aluminum foils representing the organ on our diagram.

WITH PINOO SETS, CHILDREN CAN DO HUNDREDS OF PROJECTS WITH MATERIALS THAT CAN COMFORTABLY AT HOME.