
PinooBot Talking With Lcd By Pinoo
Purpose of the Project: To create a talking Pinoobot system with pinoobot, distance sensor, light (ldr) sensor and lcd display using the Pinoo control card.
Duration: 2 lessons
Age Group: 9 years old and above
Pinoo Set: Full Set.
Benefits:
• Learns to code Pinoo control card
• Learns to code the distance sensor.
• Learns to code the light (LDR) sensor.
• Learns to code the LCD display module.
• Learns to code Pinoobot.
• Improves the skill of setting up algorithms.
• Improves coding skill.
Materials to be Used: Mblock 3 program, Pinoo Boat, distance sensor, lcd display module, light (ldr) sensor, connection cable

Materials Required for Design: Forex, scissors, silicone gun, paint

Project Preparation:

We cut a rectangular piece from forex in the size of the LCD screen.

We paste the rectangle on the LCD screen to form a floor. We paint the floor in the color we want.
 We fix the lcd module on the distance sensor pin input (label) with a silicon gun.

We fix the light sensor to the back of the Pinoobot with a screw or a silicone gun.

Let's make our connections. To our Pinoo card on the Pinoobot;
• Distance sensor to input number 6 purple / green,
• Light sensor to red input number 10,
• We connect the LCD module to the red / white input number 10 with a connection cable.

We have completed our connections, now let's move on to the coding part. For this, we will use the mblock-3 application.

Let's connect our Pinoo control card to the computer with the help of the connection cable and enter the Mblock3 application. Then, let's introduce our Pinoo control card to the computer. To do this, we first click on the serial port option from the Connect tab. Then we select COM3. (The number may differ depending on the computer and the port.)

After making the serial port connection, let's select the card we will use from the Cards tab. We are working with Arduino Nano model.

In order to add the Pinoo extension to our computer, we click on the Manage Extensions option from the Extensions tab. In the window that opens, we type "Pinoo" in the search engine and just click download to the result. It has been installed on our computer.


Come to the Extensions tab again and click on the Pinoo option. We will write our codes with the Pinoo extension.

In the coding part; Since the lcd screen can only run the code blocks, which are unique to the arduino card, we start our codes with the Pinoo program block in the Robots tab.

We introduce the type of our LCD screen. The type of LCD screen we use is 0x27 model.

Since all the code blocks we will write must work continuously, we get the repeat code block from the Control tab.

We will print on the LCD module according to the values we receive from two separate sensors. First of all, we will start with the light (LDR) sensor.
If the light value is less than 300, let the LCD screen on the Pinoo boat give us the night output. If it is not greater than 300, give the daytime printout. To create the condition loop, we get the statement if not from the Control tab.

In order to create the condition section, we get the statement is less than the Operations tab. In the first box, we place the code block related to the light sensor from the Robots tab. We change the pin number to pinoo8. In the second box, we write 300.

If the light value is less than 300, in order to print NIGHT statement on the LCD screen, we get the command ‘’Pinoo LCD print: Address 0x27 Line: 1 column: 1 write’’ command. We update the column section as 5 Summer and NIGHT.
If not, in the part, we get the same code again to write DAY on the LCD screen and update the column number to write 5 as DAY.
*** The reason we changed the column section to 5 is that we wanted to position the text in the middle of the screen.

The second sensor we will use is the distance sensor. When the Pinoobot encounters an obstacle / person while on the move, let it stand for a certain period of time and say HELLO to us on the second line of the LCD screen.
If the Pinoobot is not encountering anyone, it should move forward and print WHERE IS on the second line of the LCD screen.

. In order to understand whether the distance sensor is approaching / not approaching a person, we will use the ‘’If-not’’ condition statement. From the Control tab, we get the expression ‘’if not’’.

In order to create the condition section, we get the statement is less than the Operations tab. In the first box, we place the code block related to the distance sensor from the Robots tab. We change the pin number to pinoo6. In the second box, we write 10.

If the distance value is less than 10, the LCD will display HELLO! In order to print the statement, we get the "Pinoo LCD print: Address 0x27 Line: 1 column: 1 write command". Section of the line: 2 section of the column: 4 'Write' section HELLO! We are updating as.

After saying HELLO! with the LCD, in order for the Pinoobot to stop for 2 seconds, first we get the command ‘’Pinoo Bot For Next, Speed 0’’ from the Robots tab.
In order to stay in the stop motion for 2 seconds, we take the ‘’wait 1 second’’ command from the control tab and update the number 1 as 2.

After the Pinoobot completes the STOP process, we get the ‘’Pinoobot direction Forward, Speed 0’’ command from the Robots tab so that it can turn right at a speed of 150. We update the Direction section as Right, and the Speed section as 150.

If not in the section, we get the command Pinoo LCD print: Address 0x27 Line: 1 column: 1 in order to print WHERE YOU are on the LCD screen. We update the row section as: 2 column section: 4 and summer section as WHERE ARE YOU?

Pinoobot must move forward at a speed of 150 in order to search for human-obstacle. From the Robots tab, we get the command ‘’PinooBot Dir: Forward, Speed 0’’. We update the speed section to 150.

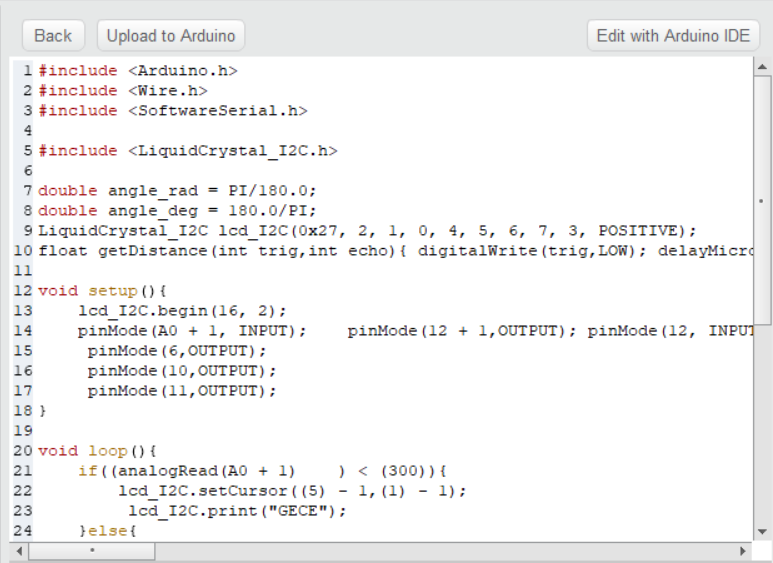
We had to load our codes into arduino to see if there was any problem in the operation of our project. For this, we right click the Pinoo program on the code block and click the ‘’Upload to Arduino’’ option. . (We work with arduino as a board.)
We are waiting for the codes to be uploaded to the card. After the installation is complete, we close the window.
When the codes are loaded, we may encounter four different situations. These are;
• Pinoobot should move forward in a bright area and if there is no person in front of it, it should write DAY and WHERE ARE YOU?
• If there is nobody in the dark area and in front of him again, the statement NIGHT and WHERE IS NIGHT should be written on the LCD screen.
• Pinoobot should move forward in a bright area and if there is any person in front of it, it should write GUN and HELLO on the LCD screen.
• If someone is present in the dark area and in front of him, the expression NIGHT and HELLO should be written on the LCD screen.

If there is no problem, we disconnect our power cable from the computer. We power our Pinoo control board with the help of a 9v battery and a battery cap. We also turn on the on / off button next to the battery input.


WITH PINOO SETS, CHILDREN CAN DO HUNDREDS OF PROJECTS WITH MATERIALS THAT CAN COMFORTABLY AT HOME.