
Radar System with Pinoo
Project Purpose: To make a radar project by using distance sensor, servo motor and button module with Pinoo Control Card.
Duration: 2 lessons
Age group: 7 years and older
Pinoo Set: Icat set, maker set and full set
Benefits:
- Learns to code the Pinoo control card.
- Learns to use distance sensor.
- Learns to use servo motor.
- Learns to use the button module.
- Algorithm building skill develops.
- Coding skill improves.
Materials to be Used: Mblock 3 program, pinoo control card, distance sensor, servo motor, button module.

Materials Required for Design: Wood pieces acrylic paint and brush, small piece of cardboard, silicone gun and silicone.

Project Preparation:
For our project, let's start with making the platform of the radar system.


We create the platform above with wooden parts.
(We used 2 big and 1 small parts. We create it so that we put the sensors on it.)

We paint the platform we created with acrylic paint.

We silicon the distance sensor to the tip of the servo motor.


We silicon the servo motor to the top of the platform.


We also silicon the button module on the upper part of the platform.

We write "Radar System" on the front.

We cover the servo motor with small cardboard.

We attach the connection cables to the sensors and pinoo control board.

We also install usb cable. We are now ready to code.

Electronic parts installed.
Adding Pinoo extension:
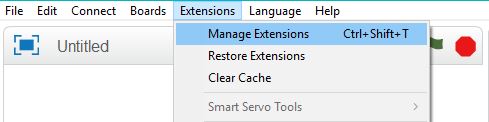
 In the window that opens, we type "Pinoo" into the search engine and simply say download to the result. It was installed on our computer.


Coding part:

When we click on the green flag, we first give a message that there is no target around.

We are creating our condition to check the button status. If it is 1, so when the buti-it is pressed, we specify it.

We add the repeat code 2 times.
(Here, the number of repetitions is the number of repetitions of looking around by moving in the distance sensor with the motion of the servo. In other words, it is the number of operations of the radar. If you wish, you can increase this number after trying and seeing it.)

First, we bring the servo motor to 0 angle and hold it.

After waiting for 1 second, we have the value of the distance sensor checked.
(The goal here is to determine whether a target has been detected.)
We will use this code block for all angles. So when it comes to every angle, we will check whether there is a target or not.

Now we make the servo motor 45 degrees and wait for 1 second.

Likewise, we check whether the distance sensor detects a target or not.

Now, we bring the servo motor to an angle of 90 degrees and control the target with the distance sensor.

Now, we bring the servo motor to an angle of 135 degrees and control the target with the distance sensor.

Now we turn the servo motor 180 degrees and check the target with the distance sensor.

Finally, if not, we bring the servo motor to 0 degrees.
* The purpose here is to move the distance sensor with the servo and notify us when it detects a target. In this way, we can create a radar system.

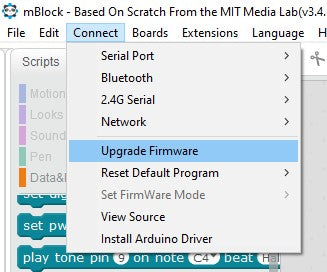
On the page that opens, we click the "Upload to Arduino" button selected in red.

Our codes are uploaded to our pinoo control card.

We click on the "Close" button after the "Download Finished" text appears. After the loading is finished, the pinoo control card and sensors are placed in the hard hat.
Working Status of the Project:

We will run this project with a computer, so we do not insert batteries. We do not remove the usb cable either.

Let's examine the movement of the distance sensor connected to the servo motor by pressing the button. We will see a warning on the screen when it detects a target.
ARDUINO IDE CODES:
#include <Servo.h>
Servo servo-;

int echo_pin = 8;
int trig_pin = 9;
long distance, time;

int button = 7;
int button;

void setup() {
  Serial.begin(9600);

  servo-.attach(4);

  pinMode(echo_pin, INPUT);
  pinMode(trig_pin, OUTPUT);
  pinMode(button, INPUT);

}

void loop() {
  button = digitalRead(button);

  digitalWrite(trig_pin, LOW);
  delayMicroseconds(5);
  digitalWrite(trig_pin, HIGH);
  delayMicroseconds(10);
  digitalWrite(trig_pin, LOW);
  time = pulseIn(echo_pin, HIGH);

  distance = time / 29.1 / 2;

  if (button == HIGH) {
    servo-.write(45);
    if (distance < 10) {
      Serial.println("There is an obstacle ...");
      servo-.write(45);
      delay(1000);
    }
    servo-.write(90);
    if (distance < 10) {
      Serial.println("There is an obstacle ...");
      servo-.write(90);
      delay(1000);
    }
    servo-.write(135);
    if (distance < 10) {
      Serial.println("There is an obstacle ...");
      servo-.write(135);
      delay(1000);
    }
    servo-.write(180);
    if (distance < 10) {
      Serial.println("There is an obstacle ...");
      servo-.write(180);
      delay(1000);
    }

  } else {
    Serial.println("No target");
  }

}

void obstacle() {
  if (distance < 10) {
    Serial.println("There is an obstacle ...");
    //servo.write(45);
    delay(1000);
  }
}