
Street Light With Pinoo
Purpose of the Project:To make a system that lights up automatically when people go on the pedestrian path by using LDR (light) sensor, green and red led module with Pinoo Control Card.
Duration: 2 lessons
Age Group: 9 years old and over
Pinoo Set: Basic,Invention,Maker,Full Set.
Gains:
• Learns to code Pinoo control card.
• Learns to use a light sensor.
• Learns to use a LED module.
• Improves the skill of setting up algorithms.
• Improves coding skill.
Materials to be used: Mblock 3 program, Pinoo control card, light sensor red and green led module, connection cables.

Materials Required for Design: Green ground, model fence, black cardboard, tongue stick, black cardboard, scissors, silicone gun and silicone.

Project Preparation:
1. For our project, we start by cutting the tongue sticks first.

As we cut our tongue stick from the bottom, we cut it from the top and make it rectangular.

We fix our tongue sticks diagonally on the green floors with the help of a silicone gun.

We cut a rectangular cut into the floor of our black cardboard for our light sensor.

Then we add black cardboard to the bottom of our path so that our materials can fit under our path, we do not forget to make room with scissors for easy connection of materials and battery connection.

We stick our light sensor so that our sensor faces out.

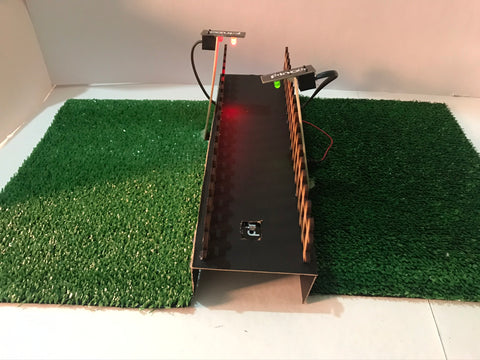
We attach our model fences to the sides of our path and place them in the middle of our grass floors.

We place our Pinoo control card at the bottom of our path and make the connections and finish our design part.

Let's make sure we make our Pinoo control card connections this way.
2.Adding Pinoo extension:


In the window that opens, we type "Pinoo" into the search engine and simply say download to the result.
It was installed on our computer.
3.Connecting the Pinoo control board to the computer:


We click on the "Serial Port" section from the window that opens and select the "COM6" option from the page that opens.
NOTE: Since the port entries of each computer are different, the numbers next to the COM text may change.


4. Coding part:


In order to control our LED module, we flash it with the code "Change LED status" under the "press button" code.

We read the values of the light sensor under the "Green Flag" code.
Next we interpret the values we take. If the value we get is less than 200, that is, when someone passes over our light sensor, our 1st LED will light up first, after 1 second, our 2nd LED will turn on and our LEDs will continue to light for 10 seconds. When the human path passes, our first led will turn off first and after 1 second, our second led will turn off.
Note: It is important when coding which door we install our leds and light sensor on the Pinoo control card.

Right click on the "Pinoo Program" command and click on "Arduino" in the window that opens.

We choose the "Install" option.

On the page that opens, we click on the "Upload to Arduino" button selected in red.

Our codes are uploaded to our Pinoo control card.

We click on the "Close" button after the "Download Finished" text appears. After the installation is finished, the battery compartment is inserted and the project is run.
5. Working Status of the Project:
When pedestrian passes, our green led will light first and after 1 second our red led will turn on. Our 2 LEDs will turn on for 10 seconds and our LEDs will turn off sequentially.
WITH PINOO SETS, CHILDREN CAN MAKE HUNDREDS OF PROJECTS WITH MATERIALS THEY CAN EASILY FIND IN THEIR HOMES.