
Cleaning Robot with PinooBot
Purpose of the Project: To create a cleaning robot with a Pinoobot and a distance sensor using the Pinoo Control Card.
Duration: 2 lessons
Age Group: 7 years and older
Benefits:
• Learns to code Pinoo control card
• Learns to code the distance sensor.
• Pinoobot meets the robot.
• Improves the skill of setting up algorithms.
• Improves coding skill.
Materials to be Used: Mblock 3 program, PinooBot Robot / Pinoo control card, Distance sensor, Connection cable.

Materials Required for the Design: Scouring pad, chenille, garbage bag, magnet, silicone gun, scissors

Project Preparation:


Cut a medium-sized rectangular piece from the sponge and attach it to the front of the Pinoobot with chenille.
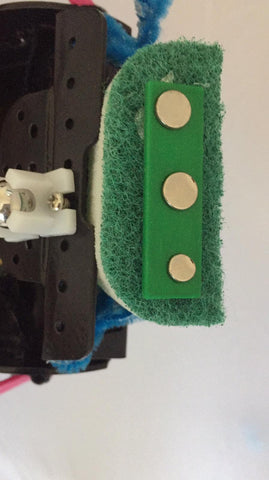
We attach three magnets to the bottom of the sponge.

You can decorate the robot according to its role as you wish.

We cut the garbage bags into small rectangular pieces and connect them with magnets. We made four pieces and you can increase the number if you wish.

We scatter the garbage we create in the area where we will operate our robot.

Let's make our connections. We connect our distance sensor to the purple / green input number 6 with a connection cable. (With your motor connections not made, let's connect to the white colored inputs that are special for the motor connections on the Pinoo control card.)

We have completed our connections, now let's move on to the coding part. We will use the mblock-3 application for this.

Let's connect our Pinoo control card to the computer with the help of a connection cable and enter the Mblock3 application. Then let's introduce our Pinoo control card to the computer. To do this, we first click on the serial port option from the Connect tab. Then we select COM3. (The number may differ depending on the computer and port.)

After making the serial port connection, let's select the card we will use from the ‘’Cards’’ tab. We are working with Arduino Nano model.

In order to add the Pinoo extension to our computer, we click on the ‘’manage extensions’’ option from the ‘’extensions’’ tab. In the window that opens, we type "Pinoo" in the search engine and just click download to the result. It has been installed on our computer.

We come to the ‘’extensions’’ tab again and click the ‘’Pinoo’’ option. We will write our codes with the Pinoo extension.

In the coding part; To start the application, we get the code when clicking the Green Flag from the Events menu.

We will get help from the dummy to learn the value read by the distance sensor. For this, we get the hello command from the view tab. Instead of the word Hello, we take the code block for the distance sensor in the Robots tab.
Since we want it to do the reading process continuously, not once, we take all our codes into the continuous repeat block from the control tab.

Let's click on the green flag and observe the change of values by bringing our hand closer to the sensor and away. Let's take note of the value read by the sensor when we bring our hand closer to the robot. We will take as a reference that it reads a value of around 10 here.

If the value read by the distance sensor is less than 10, that is, if the robot approaches an obstacle, it should turn right for 2 seconds and then move forward.If there is no obstacle in front of the robot, that is, if the value read by the sensor is greater than 10, the robot will ‘’Let's make the right and left movements’’. Now let's make this what we wrote into code.
Here we will make use of the small and large comparison operators from the ‘’if block and operations’’ tab in the ‘’control’’ tab.

Let's complete the codes that PinooBot will act according to the condition to be provided.
For the sensor reading status greater than 10, we get the PinooBot Direction: Forward Speed: 0 code block from the Robots tab. We update the directions as forward right back left, and the speed as 255 in all.
Since we want this process to be constantly controlled, we place all blocks in the repeat block.

We want each movement to make a certain amount of time. For this, we take the 1 second wait code block from the control tab under each move and update the number 1 as 2.

For the sensor reading status less than 10, we get the PinooBot Direction: Forward Speed: 0 code block from the Robots tab. We update the directions as right back and the speed as 255 in all of them. We take the command and update the number 1 to 2.

After completing our codes, we place the robot on the platform and check the operation of our project by clicking the green flag. We place the robot in the area we have determined, it will make forward, backward, right and left movements, while it will collect the garbage bags on the floor with the help of magnets. If the robot approaches an obstacle, it will turn right and move forward.
If there is no problem in the operation of our project, we need to load the codes we have written into our card in order to run our project with a power source independent of the computer.
For this, we throw away the "Click on the green flag" code we used at the beginning and the code that we made the puppet tell the sensor value and get the Pinoo program code from the Robots menu.
 Right click on the code and click the Upload to Arduino option. (We work with Arduino as a board.)

We are waiting for the codes to be uploaded to the card. After the installation is complete, we close the window.

If there is no problem, we remove our power cable from the computer. We power our Pinoo control board with the help of a 9v battery and a battery cap. We also turn the ON/OFF button right next to the battery input to the ON position.
ARDUINO IDE KODLARI:
// motor pinlerini atadık
int motora1 = 5;
int motora2 = 6;
int motorb1 = 10;
int motorb2 = 11;
// mesafe sensoru pinlerini atadık
int echoPin = 12;
int trigPin = 13;
long mesafe, sure; // mesafe ölçümü için iki değişken atadık

void setup() {
  // motor pinleri çıkış pinidir
  pinMode(motora1, OUTPUT);
  pinMode(motora2, OUTPUT);
  pinMode(motorb1, OUTPUT);
  pinMode(motorb2, OUTPUT);

  pinMode(echoPin, INPUT); // echo giriş pinidir
  pinMode(trigPin, OUTPUT); // trig çıkış pinidir

}

void loop() {
  // mesafe sensoru aktif edildi
  digitalWrite(trigPin, LOW);
  delayMicroseconds(5);
  digitalWrite(trigPin, HIGH);
  delayMicroseconds(10);
  digitalWrite(trigPin, LOW);
  sure = pulseIn(echoPin, HIGH);

  mesafe = sure / 29.1 / 2; // mesafeyi ölçtü

  if (mesafe > 10) { // mesafe 10dan büyükse
    ileri(); // ileri gider
    delay(2000);
    sag(); // saga gider
    delay(2000);
    sol(); // sola gideer
    delay(2000);
    geri(); // geri gider
    delay(2000);
  } else if (mesafe < 10) { // mesafe 10dan küçükse
    sag(); // saga gider
    delay(2000);
    ileri(); // ileri gider
  }

}

void ileri() {

}

void geri() {

}

void sag() {

}

void sol() {

}